
How to Connect Digent Smart AI to Claude via Custom MCP
How to Connect Digent Smart AI to Claude via Custom MCP (Step-by-Step Guide)
Manage and interact with your self-hosted WordPress websites directly from Claude (claude.ai) using natural language. With Digent Smart AI connected via the official Model Context Protocol (MCP), Claude gains direct, real-time access to inspect site health, draft and publish posts, manage WooCommerce inventory, audit on-page SEO, and perform safe maintenance operations.
[!TIP] Available on Free & Paid Claude Plans:
Custom MCP connectors are supported across Claude Free, Pro, and Team accounts on claude.ai.
You can connect your WordPress site without requiring paid Claude subscriptions or complex local command-line bridges.
Prerequisites
- WordPress Site: Digent Smart AI plugin installed, activated, and linked to your Digent Smart AI Cloud account.
- Claude Account: An active account on claude.ai (Free, Pro, or Team).
- Your Cloud MCP Endpoint URL: Copied from your WordPress dashboard under Digent Smart AI → Connect AI → Claude (e.g.
https://digentsmartai.com/mcp).
Step-by-Step Connection Instructions
Step 1: Copy Your Cloud MCP Endpoint URL
Log in to your WordPress Admin dashboard (e.g. https://webinlabs.com/wp-admin/admin.php?page=digent-smart-ai), navigate to Digent Smart AI → Connect AI, click on the Claude tab, and click the Copy MCP Endpoint URL button.
https://digentsmartai.com/mcp
Step 2: Open Claude & Navigate to Connectors
- Open your browser and navigate to claude.ai.
- In the left navigation sidebar, click Customize (or navigate to your account settings).
- Select the Connectors tab at the top.
- Click the + Add button in the top-right corner.
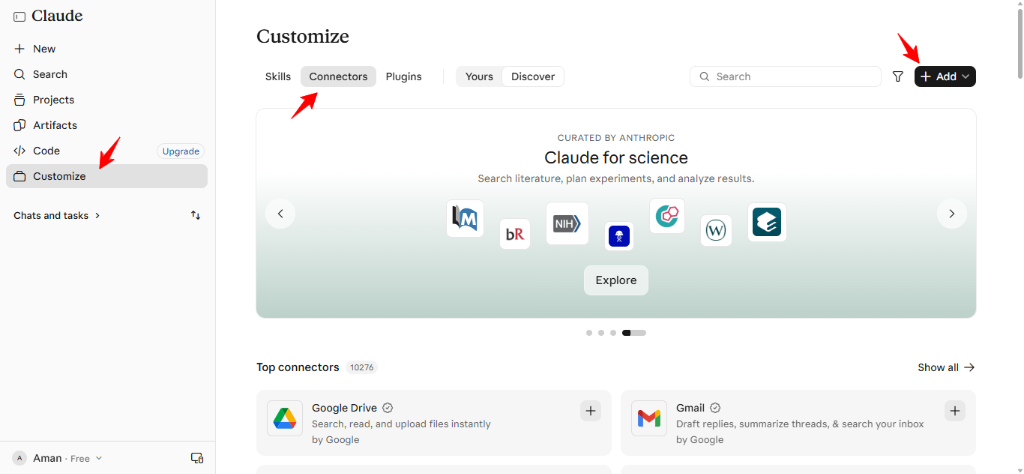
Step 3: Enter Connector Name and MCP Server URL
In the Add custom connector popup dialog:
- Name: Enter
Digent Smart AI. - URL: Paste your copied MCP Endpoint URL (
https://digentsmartai.com/mcp). - Click the black Continue button.
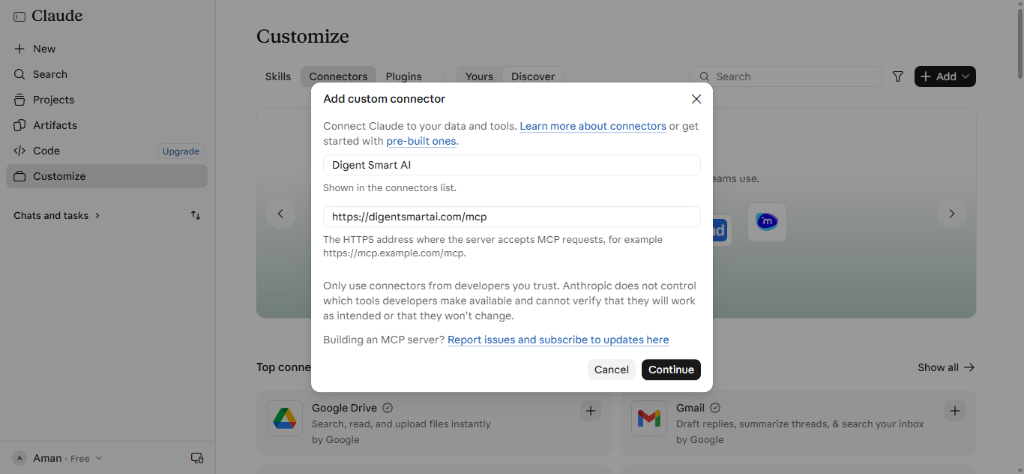
Step 4: Verify Detected Authentication Settings
Claude will contact the MCP endpoint and automatically detect the supported OAuth authentication parameters:
| Setting Field | Detected Value | Description |
|---|---|---|
| Authentication | Sign in now (Detected) | Each user signs in through the server's OAuth flow before they can use any tools or resources. |
| OAuth client | Register automatically (Detected) | Claude automatically registers its OAuth client with your Digent gateway via Dynamic Client Registration (RFC 7591). |
Keep the detected options selected and click Add connector.
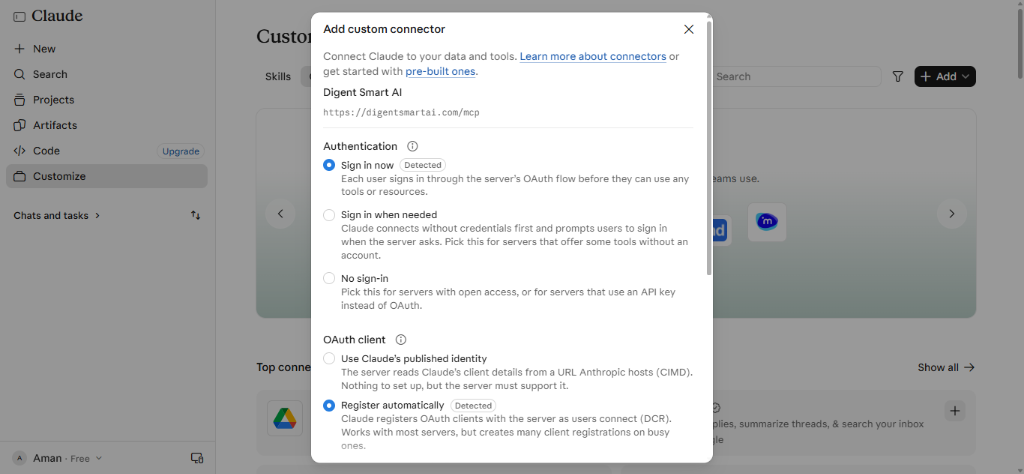
Security Note: Digent Smart AI uses an end-to-end encrypted connection with zero stored WordPress passwords. Selecting Sign in now ensures that Claude only executes actions on the WordPress websites paired with your verified Digent account.
Step 5: Authorize Claude via Email & OTP
A secure authorization window titled Authorize Claude will appear:
- Under Your Digent Account Email, enter the exact email address you used when signing up on digentsmartai.com (or the email linked to your WordPress site).
- Click Send 6-Digit Code →.
- Check your email inbox for the 6-digit one-time verification code (OTP).
- Enter the 6-digit code and click Verify & Authorize.
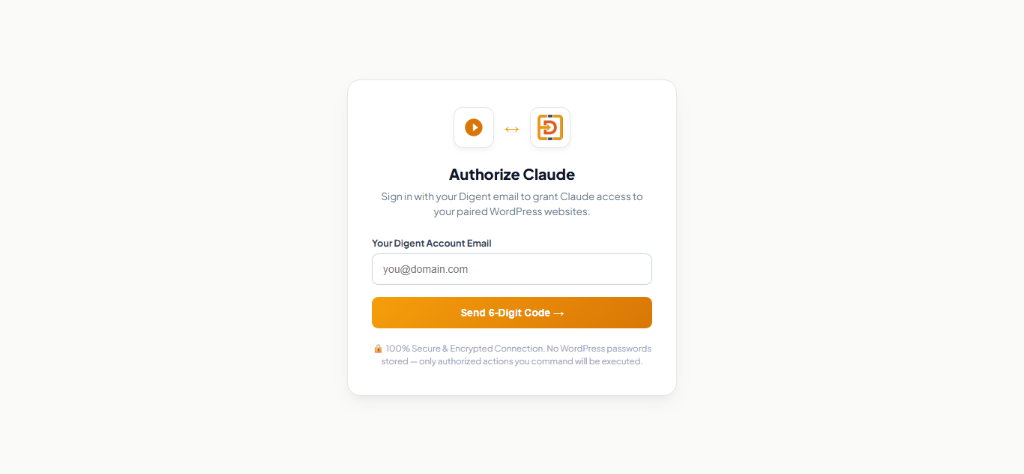
Once confirmed, Claude securely stores the authorized credentials and activates the connector immediately.
Step 6: Start a Chat & Verify Connection
- In the left navigation menu of Claude, click
+ Newto start a fresh chat conversation. - In the chat prompt, type:
Check the connection to my WordPress site
- Claude will automatically invoke the
wp_site_infotool via the Digent Smart AI integration, returning your live WordPress environment, site details, and system health status:
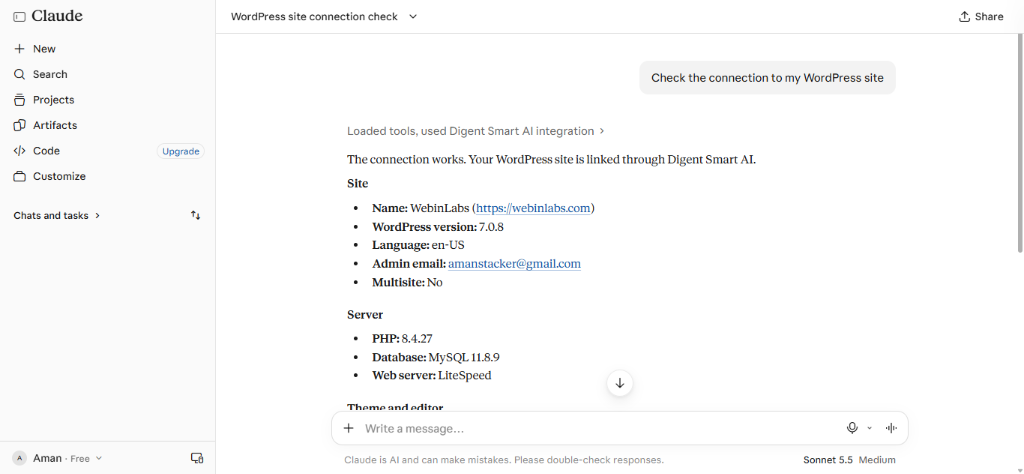
Your WordPress site is now connected and ready for natural language management!
Helpful Prompts to Try in Claude
Once connected, you can perform full WordPress administration and content operations directly through Claude:
1. Site Diagnostics & Plugin Overview
Check my WordPress site status and list all active plugins and their versions.
2. Draft & Publish Articles
Draft a comprehensive 800-word blog post on "Optimizing WordPress Core Web Vitals in 2026", format it with markdown headings, and save it as a draft.
3. WooCommerce Store Operations
Check WooCommerce sales for this week and identify any products that are currently out of stock.
4. SEO & Meta Auditing
Audit the on-page SEO for my latest post. Check the title length, meta description, and recommend internal linking opportunities.
5. Safe Database Maintenance
Inspect database transients and run a safe cache cleanup on my WordPress site.
Troubleshooting & FAQ
| Problem | Cause | Solution |
|---|---|---|
| "Cannot find Connectors tab in Claude" | Custom Connectors UI is rolling out or located under Settings. | Look for Customize in the left sidebar on claude.ai, or go to Account Settings → Connectors. |
| "Authentication failed" or "No sign-in" selected | Setup was attempted without signing in or the OTP expired. | Always ensure Sign in now is selected. OTP codes expire in 10 minutes; click "Resend Code" if needed. |
| "Multiple sites found" / "Which site to manage?" | You have multiple WordPress sites registered under one account. | In Claude, specify your Site URL or Site UUID (found in WordPress Admin → Digent Smart AI), e.g. Use site https://yourdomain.com. |
| "Connection disconnected" | OAuth authorization token was revoked or refreshed. | Navigate to Claude → Customize → Connectors → click on Digent Smart AI → select Reconnect or re-authenticate. |
Related Guides in AI Client Connectors
Have questions or need technical support?
Our engineering team is ready to help you connect your AI agents.