
How to Connect Digent Smart AI to ChatGPT via Custom MCP
How to Connect Digent Smart AI to ChatGPT via Custom MCP (Step-by-Step Guide)
Manage your self-hosted WordPress websites directly from ChatGPT (chatgpt.com) using natural language. With Digent Smart AI connected via the official Model Context Protocol (MCP), ChatGPT gains native abilities to inspect site health, draft and publish posts, manage WooCommerce inventory, audit on-page SEO, and perform safe maintenance operations.
[!IMPORTANT] Subscription Requirement Notice:
Connecting custom MCP servers is an advanced capability supported exclusively on ChatGPT Plus, Team, Enterprise, or Pro plans on chatgpt.com.
This feature is NOT available on the free ChatGPT tier. If you are currently on the free plan, you must upgrade your ChatGPT subscription to Plus or higher to add custom MCP servers.
Prerequisites
- WordPress Site: Digent Smart AI plugin installed, activated, and linked to your Digent Smart AI Cloud account.
- ChatGPT Subscription: Active ChatGPT Plus, Team, Enterprise, or Pro account on chatgpt.com.
- Your Cloud MCP Endpoint URL: Copied from your WordPress dashboard under Digent Smart AI → Connect AI → ChatGPT (e.g.
https://digentsmartai.com/mcp).
Step-by-Step Connection Instructions
Step 1: Copy Your Cloud MCP Endpoint URL
Log in to your WordPress Admin dashboard, navigate to Digent Smart AI → Connect AI, click on the ChatGPT tab, and click the Copy MCP Endpoint URL button.
https://digentsmartai.com/mcp
Step 2: Open ChatGPT Plugins Directory
Open your browser and navigate directly to: 👉 chatgpt.com/plugins
Step 3: Click "Add custom MCP"
In the top-right corner of the ChatGPT Plugins page, click the Add ▾ button and select Add custom MCP server.
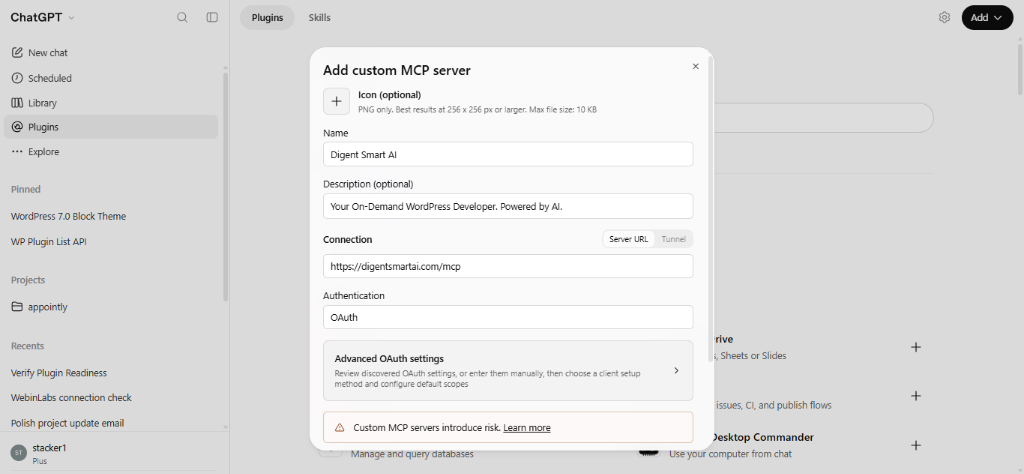
A popup modal form titled "Add custom MCP server" will appear on your screen.
Step 4: Fill in Server Details
Fill in the form fields with the following exact details:
| Configuration Field | Recommended Value |
|---|---|
| Name | Digent Smart AI |
| Description (optional) | Your On-Demand WordPress Developer. Powered by AI. |
| Connection | Select Server URL and paste your copied MCP Endpoint URL (https://digentsmartai.com/mcp) |
| Authentication | OAuth (Mandatory — Keep OAuth selected. Do NOT choose "No Auth") |
Security Note: Digent Smart AI uses a 100% secure encrypted connection with zero stored passwords. Selecting OAuth is required so the system can verify your identity and ensure ChatGPT only accesses the WordPress websites belonging to your verified account.
Step 5: Click "Create as a plugin"
Click the blue Create as a plugin button at the bottom of the modal. ChatGPT will contact your Cloud Gateway to discover and register all available WordPress MCP tools.
Step 6: Authorize & Click "Connect"
A second confirmation popup will appear on your screen displaying the plugin details and a Connect button.
Click Connect to open the secure Digent Smart AI authentication bridge.
Step 7: Enter Your Account Email
In the authentication window:
- Enter the exact email address you used when signing up on digentsmartai.com (or the email linked to your WordPress site).
- Click Send 6-Digit Code →.
Step 8: Enter Received OTP & Complete Pairing
Check your email inbox for the 6-digit one-time password (OTP) verification code. Enter the code into the verification field and click Verify & Authorize.
Once confirmed, the system generates secure credentials and automatically redirects you back to ChatGPT. Your WordPress site is now connected!
Step 9: Open a New Chat & Mention the Plugin
- In the left sidebar of ChatGPT, click
+ New Chat. - In the chat message prompt, type
@Digent Smart AI(or the name you assigned in Step 4). - Select the plugin from the mention list and type your command!
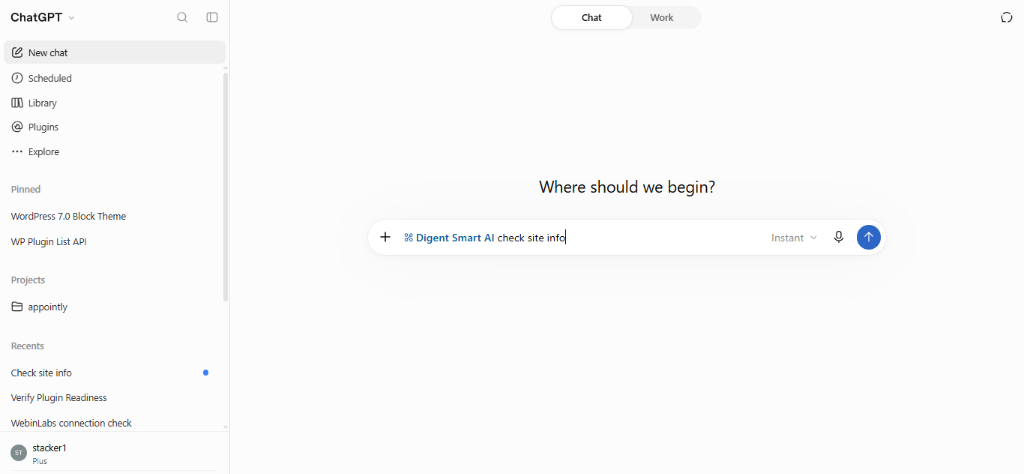
For example, type:
@Digent Smart AI check site info
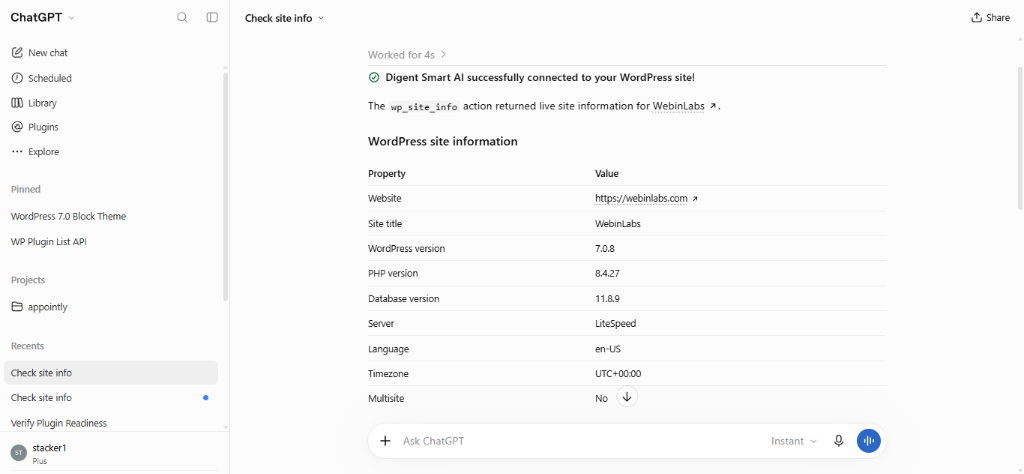
ChatGPT will communicate directly with your WordPress installation through the secure MCP tunnel and return live site details, server configuration, and health status:
Helpful Prompts to Try in ChatGPT
Once connected, you can manage your WordPress site in plain conversational English:
1. Site Environment & Health
@Digent Smart AI check site info and list all active plugins.
2. Draft & Publish Articles
@Digent Smart AI draft a 600-word blog post titled "Top 5 WordPress Maintenance Best Practices" with categories and SEO tags.
3. SEO Analysis & Meta Tags
@Digent Smart AI audit the on-page SEO for post ID 1. Suggest improvements for the title and meta description.
4. Cache & Performance Cleanup
@Digent Smart AI clear expired database transients and run a safe cache flush.
Troubleshooting & FAQ
| Problem | Cause | Solution |
|---|---|---|
| "Cannot find Add button or Plugins page" | You are on the free tier of ChatGPT. | Custom MCP servers require a ChatGPT Plus, Team, Enterprise, or Pro plan. Upgrade your account on chatgpt.com. |
| "Connection not verified" / "Tools unavailable" | Setup was attempted with "No Auth" or inside an old chat thread. | Always select OAuth during setup, and start a fresh + New Chat after connecting. |
| "Site not linked yet" | Multiple WordPress sites under one account or different email entered. | In your chat with ChatGPT, provide your Site UUID (found in WordPress Admin → Digent Smart AI), e.g. 686153e6-0065-4bed-9d6c-679fa3986caa. |
| "Authentication code expired" | The 6-digit OTP code was not entered within 10 minutes. | Click "Resend Code" in the authentication bridge window to get a fresh OTP. |
Related Guides in AI Client Connectors
Have questions or need technical support?
Our engineering team is ready to help you connect your AI agents.